Code-Along: How to Develop a REST API Dashboard

Co-Founder of Five, a low-code startup from Brisbane, Australia.
Hi and welcome to our step-by-step guide on building your first web app with Five.
Follow the steps below to build a responsive web app with a dashboard that visualizes data coming from a REST API in Five.
Goals and Outcomes
By the end of this step-by-step guide, we have developed a responsive web app connected to the DummyJSON API. The payload of the API (in our case, product data received in JSON format) is converted into relational data, and shown in our front end on a form and in a dashboard so that users can interact with the data through the application.
Before we continue, make sure to sign up for free access to the Five development environment.
Get Free Access to Five's Development Environment
Rapidly Build & Deploy an API Dashboard
Get Your App Online From US$29.99 Per Month
Host Your App Online
Select one of our hosting packages.
Starting from US$29.99 per app and month.
Unlimited end-users.
Free Training
Sign Up for a FREE product training session
To deploy your application to the web, sign up for one of our paid plans, starting from US$29.99 per month and application. Your plan includes unlimited end-users and provides you with a custom URL to access the application online.
Resources and Downloads
Preview The Application Online
To preview the application we are developing online, click here.
Download the Finished Application
Download the finished application as a Five Definition File (FDF) and import it into Five. Once imported, run the application by clicking the "Deploy to Development" button, located in the top-right corner of Five.
Step 1: Creating a New Application
1.1. To create a new application in Five, click on Applications.

Image 1.1: Creating a New Application
1.2. Next, click on the yellow Plus icon.

Image 1.2: Creating a New Application in Five
1.3. Type My First App in the Title field.
1.4. Click on the Tick ✔️ icon to save.

Image 1.3: Saving a New Application
Step 2: Running Your Application ▶️
You can run and preview your application at any time. To do so, click on the Deploy to Development button in the top navigation bar. The first deployment of your app can take some time, as Five is creating a cloud-hosted instance, including a database server and unique URL, for your app.

Image 2.1.: To deploy your application to development, click on Deploy to Development
Once your application is deployed, the Deploy to Development button turns into a Run ▶️ button in the top right corner.
Every time you click on Run ▶️, a new window opens up, showing the current state of your application.

Image 2.2: Running Your Application
Step 3: Data > Connection Wizard: Adding an API As a Data Source
We will now use Five's Connection Wizard to connect Five to an external API. Once the API is connected to Five, it can be used as a data source inside of Five.
3.1. Click on Data > Connection Wizard.

Image 3.1: The Connection Wizard
3.2. Next, click on Read List Mapping inside the Connection Wizard.
3.3. We will use the DummyJSON API available here: https://dummyjson.com/
3.4. Inside Read List Mapping, paste the URL for the get all products request: https://dummyjson.com/products
3.5. Click on Send. Five now shows you the API's response: a list of products in JSON format.

Image 3.2: Once the API URL has been filled in, click on Send to get a response
3.6. Click on Field Mapping to understand how Five treats the API response: Five maps the fields from the API response into fields, and tries to identify the primary key of the data.
3.7. Inside the Field Mapping, change the Default Display Type of the "products"[]."description" field to _Memo.
3.8. Make sure that the id field is selected as the Primary Key.

Image 3.3: Field Mapping Inside the Connection Wizard
3.9. Next, click on Read Single Mapping.
3.10. Inside Read Single Mapping, paste the URL for the get single product request: https://dummyjson.com/products/:id
3.11. Click on General.
3.12. In the WebService dropdown, select New.
3.13. Fill in the required fields. Write DummyJSON into the WebService ID field, and ProductAPI into the Name field.
3.14. Here's what your API connection should look like. Click on the Tick ✔️ icon to save.

Image 3.4: The General Settings of the API Connection
To confirm that your API has been set up as a data source in Five correctly, click on Data in the top navigation, and then on Connections. Your API connection should now appear in the list of connections.
Step 4: Visual > Form Wizard: Creating a Form on the API
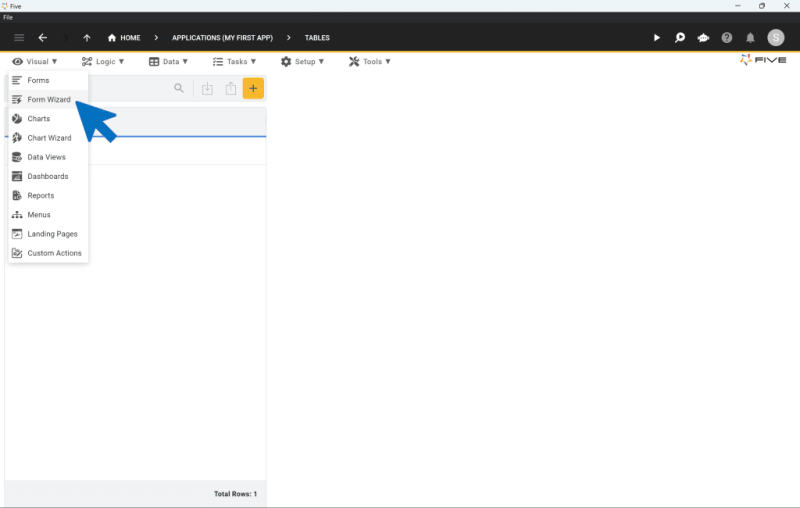
Image 4.1: Five's Form Wizard is used to create forms in end-user applications
4.2. Select ProductsAPI as the Main Data Source.
4.3. Write Product Form in the Caption field.
4.4. Click on the Tick ✔️ icon to save the form.
First Checkpoint: Run Your Application
It's time to run your application again. As shown in Step 2 above, you can always preview your application by clicking on the Run ▶️ icon in the top right corner.
Here's what your app should look like. On the left, you should now see a new menu item called Product Form (your app will have different colors, because we haven't themed it yet).

By clicking on Product Form, users can see all of the API's data in a form created by Five.
Currently, the API returns a total of 30 rows of data. When you click on any of the products sent by the API, you can see its details. Because the API doesn't let us update or delete products, the forms is read-only. If we had an API endpoint for each HTML method (GET, PATCH/PUT, POST, DELETE), our form could be configured with full create, read, update, and delete permissions.
Next up, we want to build a feature that extracts product data from the API and stores the data in the Product database table.
Step 5: Visual > Charts: Visualizing the Data From the API
We will now add two charts to our application: a bar chart and a line chart that visualize data received from the API.
5.1. Click on Visual > Chart Wizard.
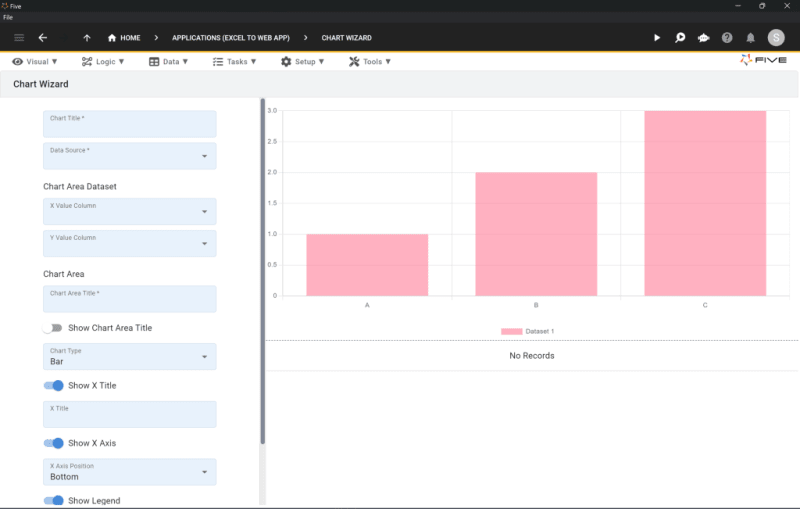
Image 5.1: Five's Chart Wizard can be used to create charts on an API
5.2. Fill in all required fields as follows:
Chart Title: Stock On Hand
Data Source: ProductAPI
X Value Column: title
Y Value Column: stock
Chart Area ID: StockChart
Chart Area Title: Stock Chart
Chart Type: Bar
5.3. Click on the Tick ✔️ icon in the top-right corner to save your Stock Chart.
5.4. Repeat the same steps for your Product Chart, which will be a line chart.
Chart Title: Product Prices
Data Source: ProductAPI
X Value Column: title
Y Value Column: prices
Chart Area ID: Price Chart
Chart Area Title: Price Chart
Chart Type: Line
5.5 . Click on the Tick ✔️ icon in the top-right corner to save your Price Chart.
You are done with your charts. Now let's combine them into a dashboard.
Step 6: Visual > Dashboard: Combining Multiple Charts In a Dashboard
6.1. Click on Visual > Dashboards.
6.2. Click on the yellow Plus ➕ icon to add a new dashboard.
6.3. Fill in the following fields:
Title | API Dashboard |
Columns | 2 |
Rows | 2 |
This creates a 2x2 grid for us to position our charts in our dashboard.
6.4. Click on Actions

Image 6.1: Creating a Dashboard in Five
6.5. In Actions, click on the Plus ➕icon to add new actions to our dashboard.
6.6. Select Page Position A1 and choose StockChart (Chart) as an Action. Click on the the Tick ✔️ icon to save.

Image 6.2: Adding Actions to a Dashboard
6.7. Repeat step 6.6 for PriceChart by selecting Page Position B1 and PriceChart (Chart) as the Action. Last, put ProductAPI (Form) into Page Position A2. Here's what your Actions should look like for your dashboard:

Image 6.3: Configure your dashboard actions as shown in the image
6.8. Last, save your dashboard by clicking the Tick ✔️ icon.
We have now successfully created a dashboard by utilizing Five's grid layout and populating the grid with actions. Let's move on and add the dashboard to our application.
Step 7: Visual > Menus: Adding Menu Items to Your App
7.1. Go to Visual > Menus.
7.2. Click on the yellow Plus icon.
7.3. Type Dashboard into Caption.
7.5. Type 2 into Menu Order.
7.6. In the Action drop-down select API Dashboard (Dashboard) as the action.
7.7. Click on the Tick ✔️ icon to save your new menu item.
Second Checkpoint: Run Your Application
It's time to run the application again. Here's what it should look like (again, your app will have different colors, because it doesn't have a theme).

Let's check out what we have developed:
We have a responsive web app that visualizes data from our REST API. The REST API serves as a data source for our end-user GUI.
We have a Product Form, which can be used to see the details of each product that the REST API sends to us. We can't update these products, because the API doesn't give us permissions, but this could easily be changed using Five's Connection Wizard.
We could extend this application by adding user logins, creating a theme, a PDF report, email notifications, or workflows. Five lets us write SQL, JavaScript and TypeScript, making it an extremely flexible coding environment.
We could even extract data from the API and push it into a purpose-built MySQL database. It's very easy and fast to create a database in Five is. By storing data from the API in a database, it would enable us to query data from the API in SQL. Learn how to do this in our step-by-step guide here, where we add a button to each product page that pushes data into a database, as shown here:

By adding a Push Into DB button we can extract data from the API and push it into a custom SQL database.
Finding Help in Five
In case you get stuck during the development process, we're here to help! Continue developing your application by accessing these resources:
Five's User Community: Visit https://five.org to ask questions or get inspiration from other users.
Five's Documentation: Visit help.five.org to access Five's comprehensive documentation.
Five's In-App Help
Last, find useful tips for your application development by clicking on Five's in-app help available in the top right corner or on almost any field.

Get Your App Online For US$29.99 Per Month
Five lets you develop your application locally free of charge. Use our free download and build your application until it's ready for its end-users.
To deploy your application, sign up for one of our paid plans, starting from US$29.99 per month and application. Your plan includes unlimited end-users and provides you with a custom URL to access the application online.


